Configuration - Smart Payment Rules Manager
Buy NowThe Smart payment rule manager plugin depends on the NopAdvance Core plugin. Make sure the core plugin is installed first, as the smart payment rule manager plugin will not function without it.
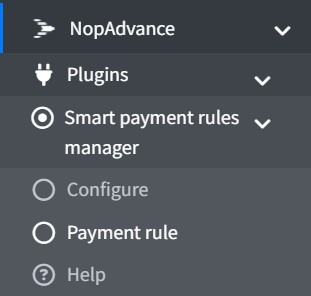
Once the plugin has been installed, you will see the plugin menu under NopAdvance > Plugins > Smart Payment Rules Manager in your nopCommerce admin menu, similar as displayed in the below image.
This configuration page allows you to enable the plugin and manage basic logging behavior. As displaying in the image below.
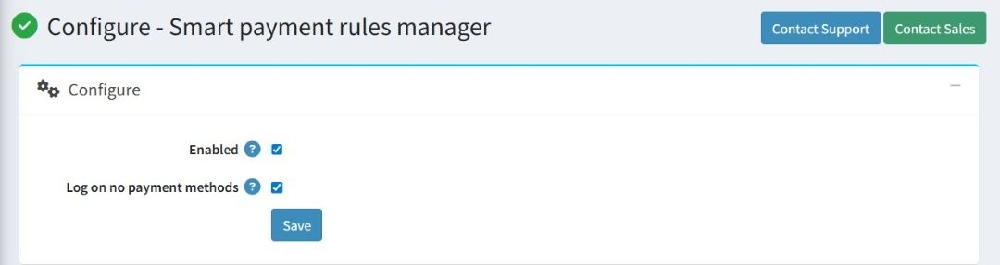
- Enable: The plugin is active and will apply any created payment rules during checkout.
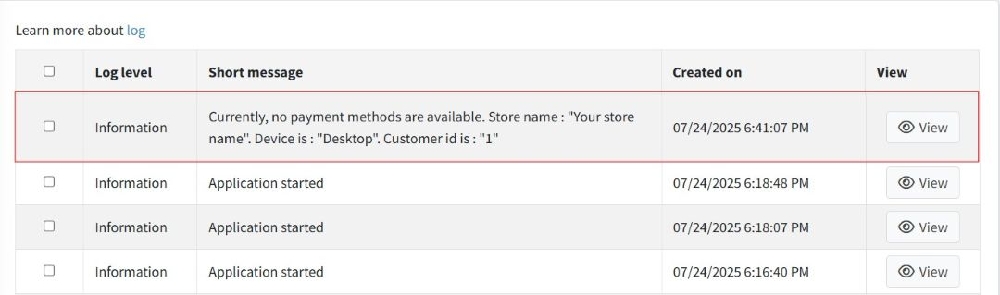
- Log on no payment methods: Enables logging when no payment method is shown to the customer because of rule restrictions. If none of the payment methods meet the rule conditions and nothing is displayed at checkout, a log entry will be created.
After making any changes to these two settings, always click Save to apply and store the configuration.
Payment rules
Once the plugin is successfully configured using the global settings, the next essential step is to define custom payment rules that determine how payment methods behave for different users and scenarios.
These rules allow store administrators to precisely control when and how specific payment options appear during checkout based on device type, date range, payment method, or store configuration.
Let’s now explore the Payment Rules section, where you can add, edit, and manage all such rules to ensure a flexible and optimized payment experience for your customers.
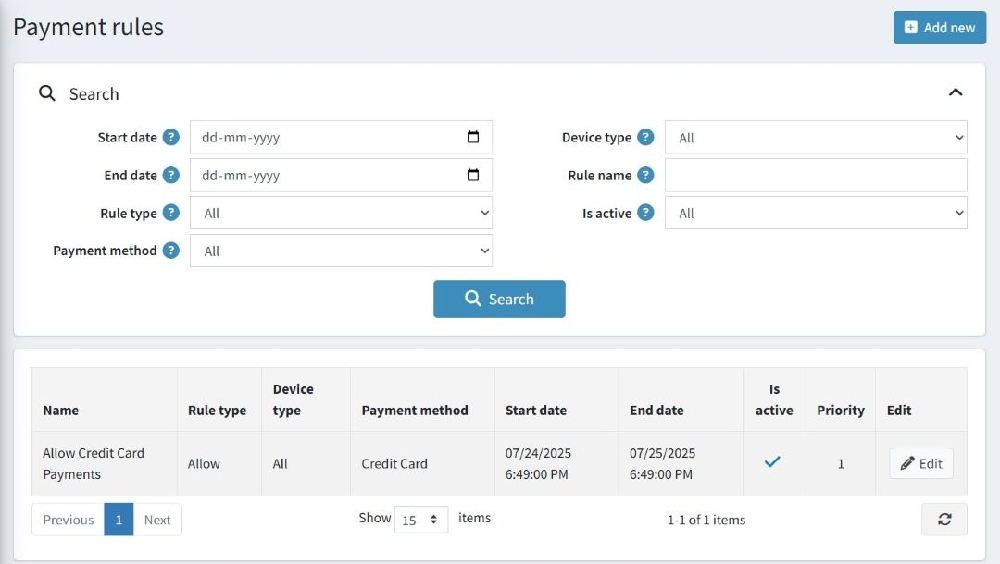
Search Filters
At the top of the page, users can filter and search for specific payment rules using the following fields:
- Start Date / End Date: Filter rules that fall within a specific active date range.
- Rule Type: Choose between:
- Allow – Enables the selected payment method under defined conditions.
- Restrict – Disables the selected payment method under defined conditions.
- Payment Method: Select the payment method (e.g., Credit Card, PayPal) to filter rules applied to it.
- Device Type: Filter rules based on the device type (e.g., Desktop, Mobile, All).
- Rule Name: Search by the name of the payment rule.
- Is Active: Filter rules by their active status (All / Active / Inactive).
Click the Search button to apply filters and view the matching rules in the list below.
Rules List Table
The lower section displays a list of all configured payment rules along with their details along with an edit for modify the existing rule settings.
Add New Rule
Click the "Add new" button (top right) to configure a new payment rule. You will be redirected to a form where you can define rule conditions, such as the device type, payment method, date range, store, customer role, and more.
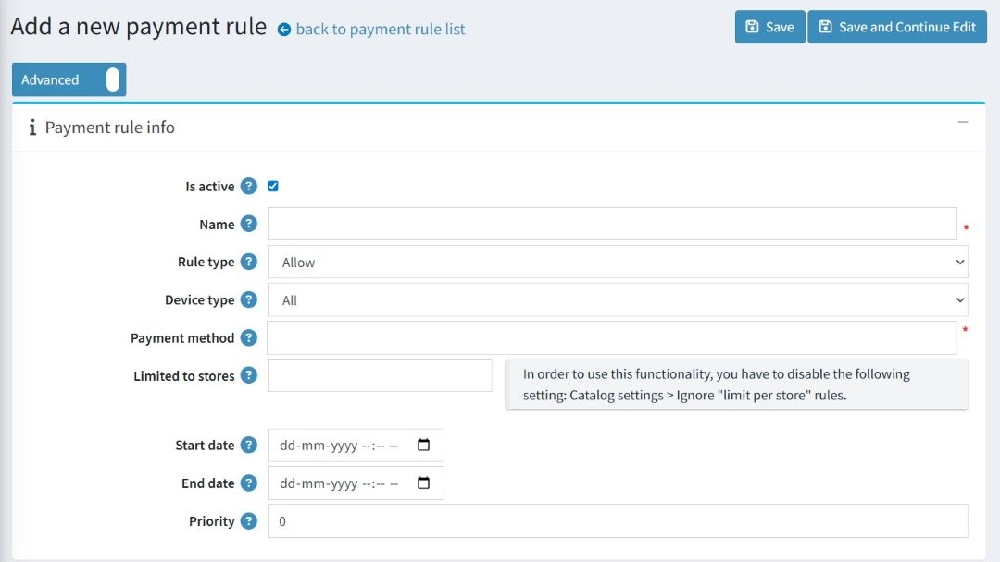
Payment rule info from fields description:
- Is Active: Check this box to activate the rule immediately upon saving.
- Name: Enter a name for the payment rule (required). This name is used for internal identification.
- Rule Type: Choose between:
- Allow – Only allows the selected payment method when conditions are met.
- Restrict – Hides or disables the selected payment method when conditions are met.
- Device Type: Select which device the rule applies to:
- Desktop
- Mobile
- All
- Payment Method: Select the specific payment method (e.g., Credit Card, Bank Transfer) that this rule applies to (required).
- Limited to Stores: If your nopCommerce instance has multiple stores, use this field to restrict the rule to specific stores.
- Start Date / End Date: Define the date range during which the rule is active.
- Priority: Set the priority value to control rule precedence. Rules with lower values are evaluated first.
Once the payment rule details are added successfully, on click of save and continue edit a new section will be enabled “Requirement”
The requirements section allows you to fine-tune the applicability of each payment rule by setting specific conditions. These conditions (also called requirements) must be met for the rule to take effect. You can apply a single requirement or group multiple requirement types together.
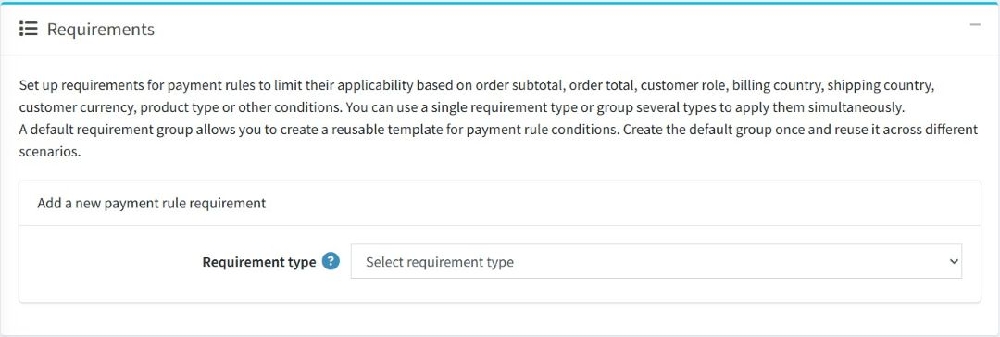
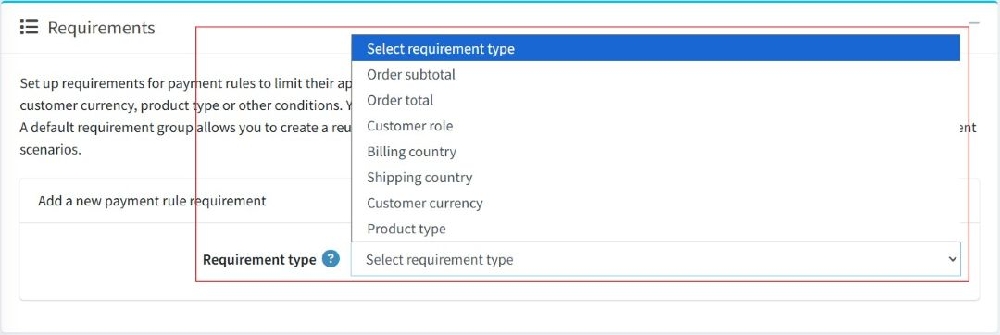
Requirement type description:
- Order subtotal: Apply the rule only if the order's subtotal (before discounts, taxes, shipping) falls within a defined range.
- Order total: Apply the rule based on the final order total, including taxes, discounts, and shipping.
- Customer role: Restrict the rule to customers assigned to specific customer roles (e.g., Registered, Guest, Vendor).
- Billing country: Make the rule apply only if the customer’s billing address country matches the selected country(ies).
- Shipping country: Make the rule apply based on the shipping address country.
- Customer currency: Apply the rule based on the currency selected by the customer (e.g., USD, EUR). Useful for multi-currency stores.
- Product type: Apply the rule only when the cart contains products of a specific type (e.g., simple, downloadable, etc.).
Post-Rule Creation
- The rule starts applying immediately after the start date and when the specified conditions are met (e.g., certain customer roles, order totals, specific payment methods).
- The Payment Methods section will display which methods are available based on the rule, so only valid options appear for the customer.
- If the requirements are set (e.g., customer currency, order total), the rule will apply only when those requirements are satisfied.
- For example, if the rule is set to apply only when the order total is above and equal to $50, and the customer’s order is under $50, the rule will not apply, and a different payment method or rule will take precedence.
- When the customer reaches the checkout page, the system will evaluate the active payment rules and display the valid payment methods based on the active rules.
- If needed, the rule can be edited to change the criteria, payment methods, or active status
Example Scenario:
Rule Name:
Allow Credit Card Payments (This rule allows customers to pay via Credit Card only when specific conditions are met.)
Configuration Details
- Name: Allow Credit Card Payments
- Rule Type: Allow
- Device Type: All (applies to desktop, mobile, and tablet users)
- Payment Method: Credit Card
- Limited to Stores: This field is left blank, so the rule will apply across all available stores in the system.
- Start Date: 24th July 2025
- End Date: 31st December 2025
- Priority: 1 (Highest)
Conditions Applied:
This rule is designed to work only if the following conditions are met during checkout:
- The order total is greater than $50
- The customer’s currency is set to USD
The shopping cart contains only simple products.
Behaviour:
When a customer places an order and all the above conditions are satisfied, the Credit Card payment method will be shown at checkout.
However, if any of the conditions fail- such as the order total being only $40 or the cart containing a downloadable product- then all the payment methods will visible to the customer.