Purchase orders - Purchase Order Inventory Management
Buy NowPurchase Order List Page
This is where you create and manage purchase orders. These purchase orders can work with or without having a supplier, meaning, you can use this system to only manage systematic stock receiving without a lot of overhead.
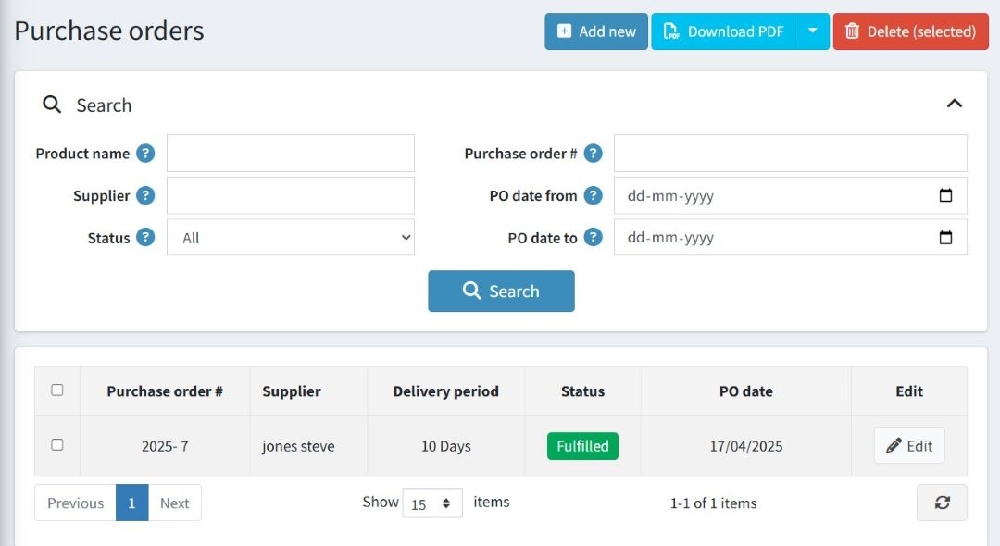
Below is a picture of how your purchase order list page would look like.
➕ Top Action Buttons
- Add New – Create a new purchase order.
- Download PDF – Export the purchase order list or selected PO(s) to PDF.
- Delete (selected) – Remove selected purchase orders from the list.
🔍 Search Filters
Use the filters at the top to narrow down your search:
- Product Name – Search by the name of a product linked to the PO.
- Supplier – Filter purchase orders by supplier name.
- Status – Choose between “All”, “Pending”, “Fulfilled”, "Cancelled" statuses.
- Purchase Order # – Search by a specific PO number.
- PO Date From / To – Select a date range to view purchase orders created within that period.
Click the Search button to apply filters.
📋 Purchase Orders List
Below the filters, you’ll find the list of purchase orders:
- Checkbox – Select one or more POs for bulk actions (like delete).
- Purchase Order # – Unique number for each PO.
- Supplier – Name of the supplier.
- Delivery Period – Expected delivery duration.
- Status – Displays the current status (e.g., Pending).
- PO Date – The creation date of the PO.
- Edit – Click the ✏️ Edit button to update PO details.
🛒Add a Purchase Order
Once you click on the “Add New” button, it will display the add new PO page as shown in the image below.
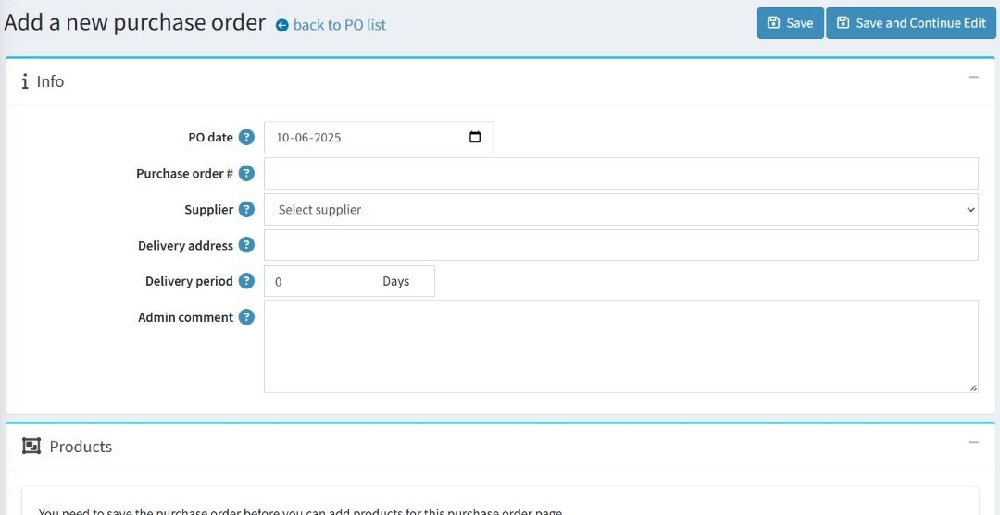
📝Info Section:
- PO Date: Auto-filled with today’s date. You can change it manually.
- Purchase Order #: Manually enter PO, in case of PO ID and mask no. desabled from plugin configuration. If ID and mask no. is enabled from configuration page, then
- Supplier: Choose from the existing suppliers.
- Delivery Address: You can specify the delivery address for the products ordered.
- Delivery Period: Expected delivery time in days.
- Admin Comment: Optional internal notes.
- Save: Click Save after editing the purchase order to apply the changes.
- Save and Continue Edit: Use this option to save your changes and continue editing the order details.
Once a purchase order has been created, it opens in edit mode after you click the “Save and Continue Edit” button, or you can also click on the “Save” button which will redirect you to the Purchase Order List page.
🧾Editing a Purchase Order
If a purchase order is in edit mode, you will see a screen similar to the below image with more action buttons on the top of the page along with some additional fields in the PO info section. Mapping products and PO history is also available during the edit mode as per the standard nopCommerce functionality.
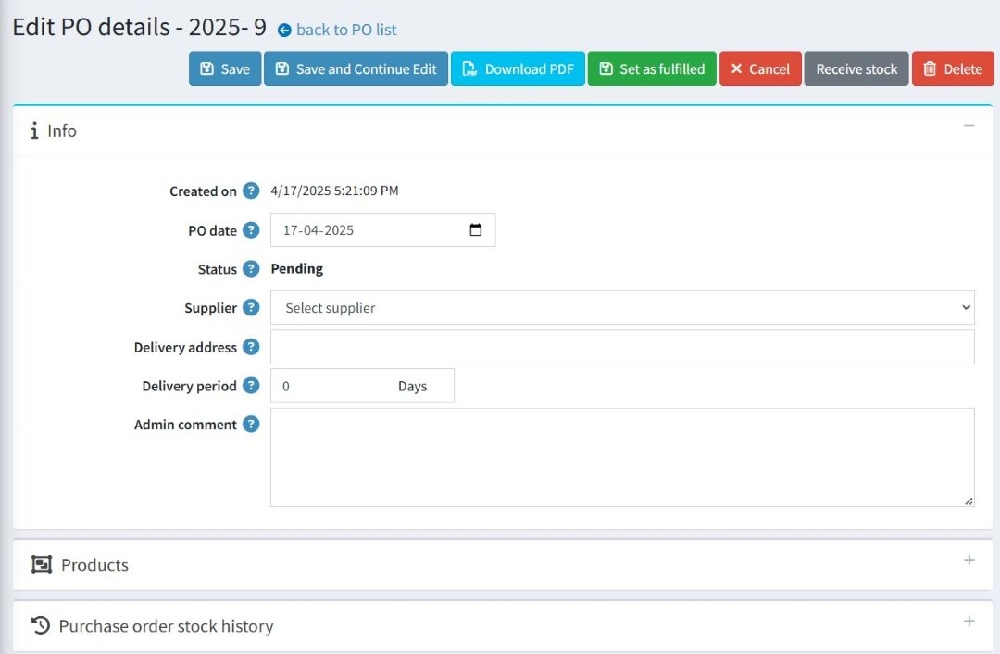
🛠️Edit Purchase Order Information:
- Created On: View the creation date of the purchase order.
- PO Date: Modify the purchase order date if needed.
- Status: You can change the order status from "Pending" to other statuses such as "Fulfilled" or "Cancelled" depending on the order's progress.
- Purchase Order #: The unique identification number for the order. This can be updated if required.
- Supplier: Select or change the supplier for the purchase order from the drop-down menu.
- Delivery Address: Modify the delivery address if necessary.
- Delivery Period: Change the delivery period, specifying how long it will take for the products to be delivered.
- Admin Comment: Add or modify internal comments for reference.
Action Buttons:
- Download PDF: Click Download PDF to generate and download a PDF version of the purchase order.
- Set as Fulfilled: You can mark the PO as Fulfilled by clicking the Set as Fulfilled button. once fulfilled , PO cannot be edit again.
- Cancel: Click Cancel to cancel the purchase order. Once cancelled , PO cannot be edit again.
- Receive Stock: If the products from the purchase order have been delivered, you can update stock by clicking Receive stock. We’ll cover this in detail in the Stock fulfillment section within this user guide.
🧊 Products Section
Once the purchase order is added it should display in the stock history as shown in the image.
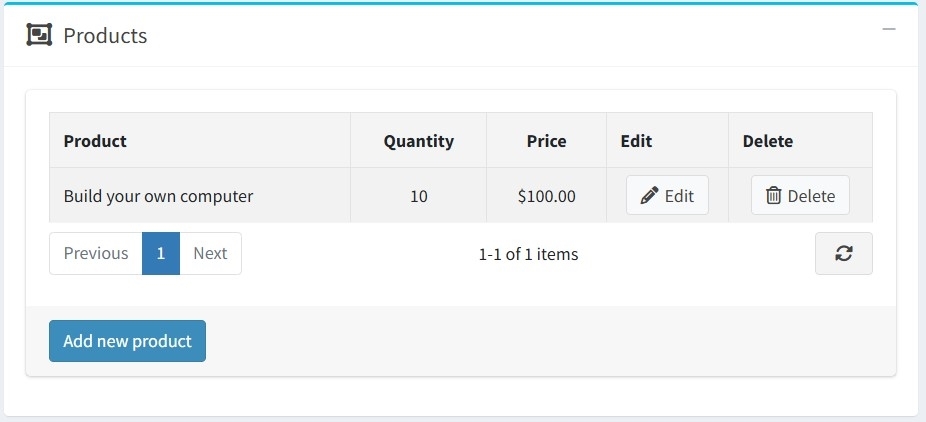
- Add New Product: You can add products to the purchase order by clicking on the Add new product button.
- Edit Products: After adding a product, you can edit details such as quantity and price.
📊 Purchase Order Stock History:
Once the received stocks are added it should display in the stock history as shown in the image.
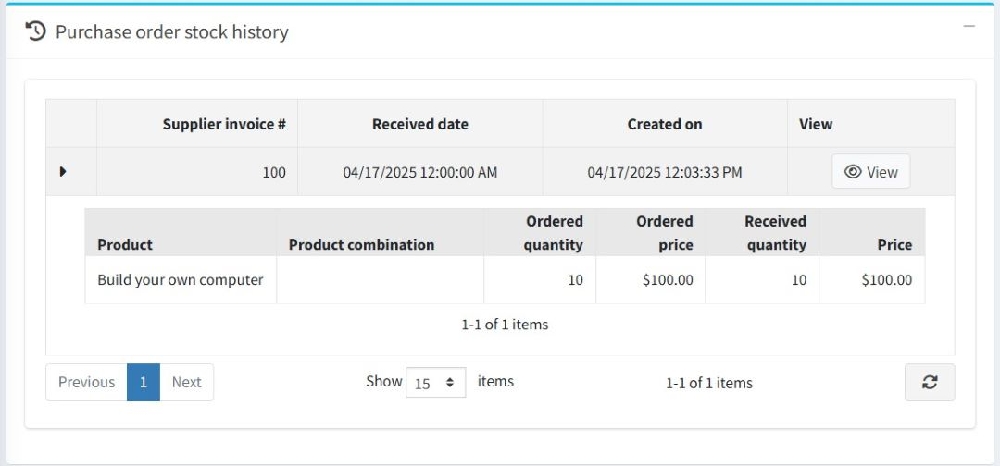
This section allows you to track the stock history for this purchase order.
- Supplier Invoice #: View and manage the supplier's invoice number associated with this purchase order.
- Received Date: Track when products were received.
- Created On: View the creation date of stock history entries.