Configure - Plugin Guide
Buy NowThis plugin comes bundled with the NopAdvance Core plugin, which is a prerequisite for its operation. Please follow the plugin installation instructions available here to proceed with the setup.
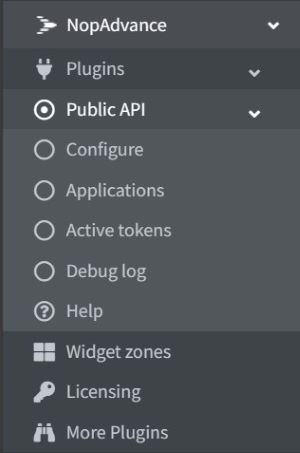
After successful installation, navigate to the plugin menu by selecting NopAdvance > Plugins > Public API from your nopCommerce admin dashboard. This should reflect a menu similar to what is shown in the following image.

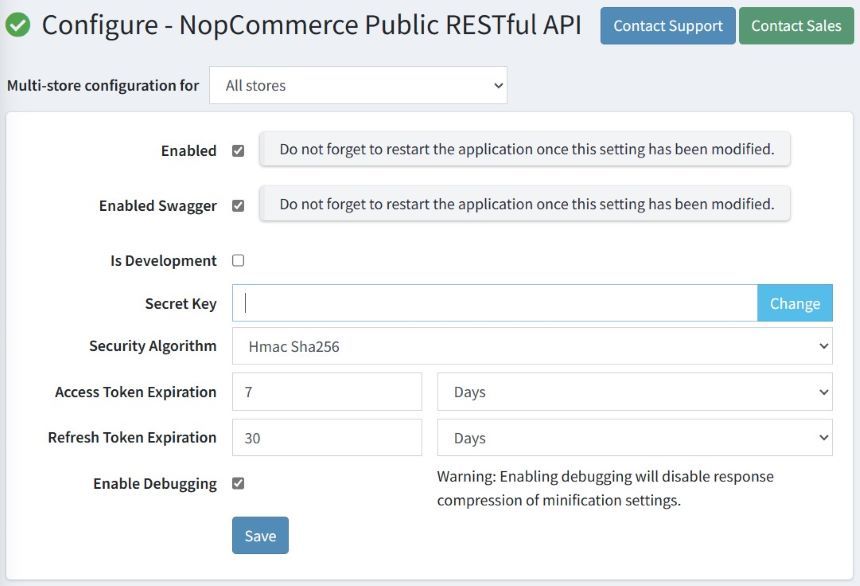
After selecting the Configure option, you'll be directed to the configuration page, as depicted in the accompanying image. On this page, you have the flexibility to activate or deactivate various plugin functionalities. Additionally, it allows you to establish default settings for certain general aspects of the plugin.

The settings provided are detailed below:
- Multi-store Configuration: This feature allows administrators to tailor the plugin settings either for individual stores or uniformly across all stores. This ensures that the plugin's functionalities can be customized store-wise based on the configurations set on this page.
- Enable API: Toggle this option to activate the public API plugin. This setting makes the plugin's features available for use.
- Enable Swagger: Activating this option will enable the swagger documentation. When enabled, the swagger documentation can be accessed via a URL pattern similar to `your_domain_name/api`. If this option is disabled, any attempts to access the URL will result in a “Page not found” error.
- Is Development: Enabling this setting bypasses the login authorization requirement, meaning that no API key is needed to use any API method, and no access token will be generated. Consequently, all methods that do not require a signed-in user will operate without an API key, and no guest user accounts are created. By default, the 'builtin@search_engine_record.com' user is assumed.
- Secret Key: This key serves as the JWT secret for signature validation and for encrypting payload information. It can be updated as necessary.
- Security Algorithm: Offers a choice of security algorithms for token encryption. The default setting is 'Hmac SHA256'.
- Access Token Expiration: This parameter allows setting a validity period for access tokens, after which they automatically expire. A refresh token is needed to renew an access token post-expiration.
- Refresh Token Expiration: Sets the lifespan for refresh tokens, after which they automatically expire. Refresh tokens are generated anew with each new access token issuance.
- Enable Debugging: Turning this on will log all requests and their responses. Note that enabling this feature may disable nopCommerce's response compression, potentially impacting performance.
- Modifying certain settings necessitates a manual restart of the application.
- Activating the "Is Development" setting is not advised in production environments.
- Changing the "Secret Key" is generally discouraged unless necessitated by security concerns.